- Power BI is awesome! (I knew that going in, but I thought this needs re-iterating :))
- Cloud computing is yesterday, Fog computing is tomorrow.
- With all the investment to SQL Azure, the box version of #SQL16 will be the best ever.
- But if you’re not in the cloud yet, then you’re already behind (see no. 2)
- If you cannot pronounce “r” then you’re in trouble. Soon, everyone will speak R.
Category Archives: Tech
installing INGInious on Microsoft Azure
I learned about the existence of INGInious during my trip in Belgium. INGInious is an external code grader that can be integrated with edX. It is written in Python, uses docker, and runs on Linux CentOS server. I won’t go about and explain about it in details since it is quite documented here. But I want to document some notes during my effort to get it up and running on Microsoft Azure. Special thanks to Guillaume, the creator of INGInious, who helped me navigate the installation and configuration process.
Provision a Linux VM on Azure
I covered this on my previous post on installing open edX, the only difference here is that instead of selecting Ubuntu based image, this time I used OpenLogic’s Centos-based image.
Configure the server and install INGInious
- Connect to the server using an SSH client.
- Install pre-requisites.
sudo yum install epel-release
sudo yum install git mongodb mongodb-server docker python-pip gcc python-devel python-yaml python-ldap
sudo pip install pymongo pytidylib docker-py sh web.py docutils
sudo yum install python-flup libtidy
- Enable mongod and docker service and start them.
sudo systemctl enable mongod
sudo systemctl enable docker
sudo systemctl start mongod
sudo systemctl start docker
- Create docker group and add yourself to it.
sudo groupadd docker
usermod -aG docker <your_user_id>
- Clone INGInious and edit configuration file.
git clone https://github.com/UCL-INGI/INGInious.git
cd INGInious
cp configuration.example.yaml configuration.yaml
- Edit INGInious/configuration.yaml.
- Modify the containers.
containers:
    default: ingi/inginious-c-default
    sekexe: ingi/inginious-c-sekexe
    mono: ingi/inginious-c-mono
- Modify the docker_instances.
docker_instances:
  - server_url: "unix://var/run/docker.sock"
- Modify the plugins (this is to enable the interface with edX).
plugins:
  - plugin_module: frontend.plugins.edx
    courseid: "<your_INGInious_course_id>"
    page_pattern: "/edx"
- Pull the pre-built docker containers.
sudo docker pull ingi/inginious-c-default
sudo docker pull ingi/inginious-c-sekexe
sudo docker pull ingi/inginious-c-mono
- By this time you should be able to run INGInious on the Python web server. It will be running on localhost:8080.
python app_frontend.py
Install lighttpd web server
- Install lighttpd with fastcgi.
sudo yum install lighttpd lighttpd-fastcgi
- Add lighttpd user to docker and mongodb groups.
sudo usermod -aG docker lighttpd
sudo usermod -aG mongodb lighttpd
- Copy INGInious and give lighttpd access.
sudo cp -avr INGInious /var/www/INGInious
sudo chown -R lighttpd:lighttpd /var/www/INGInious
Configure lighttpd
- Edit /etc/lighttpd/lighttpd.conf.
server.document-root = "/var/www/INGInious"
- Edit /etc/lighttpd/modules.conf.
server.modules = (
        "mod_access",
        "mod_alias"
)
include "conf.d/fastcgi.conf"
- Edit /etc/lighttpd/conf.d/fastcgi.conf.
server.modules   += ( "mod_fastcgi" )
server.modules   += ( "mod_rewrite" )
fastcgi.server = ( "/app_frontend.py" =>
(( "socket" => "/tmp/fastcgi.socket",
   "bin-path" => "/var/www/INGInious/app_frontend.py",
   "max-procs" => 1,
  "bin-environment" => (
    "REAL_SCRIPT_NAME" => ""
  ),
  "check-local" => "disable"
))
)
url.rewrite-once = (
  "^/favicon.ico$" => "/static/favicon.ico",
  "^/static/(.*)$" => "/static/$1",
  "^/(.*)$" => "/app_frontend.py/$1",
)
- Make SELinux permissive.
sudo setenforce 0
- Edit /etc/selinux/config.
SELINUX=permissive
- Enable and start lighttpd service.
sudo systemctl enable lighttpd
sudo systemctl start lighttpd
- By this time, INGInious should run on the http port of your server.
I will cover integrating INGInious with edX in the next post.
download elasticsearch error during Open edX installation
Bumped to this error a couple of times during my install of open edX on Microsoft Azure (check out the step-by-step here).
TASK: [elasticsearch | download elasticsearch] ******************************** failed: [localhost] => {“failed”: true, “item”: “”}
msg: Failed to validate the SSL certificate for download.elasticsearch.org:443. Use validate_certs=no or make sure your managed systems have a valid CA certificate installed. Paths checked for this platform: /etc/ssl/certs, /etc/pki/ca-trust/extracted/pem, /etc/pki/tls/certs, /usr/share/ca-certificates/cacert.org, /etc/ansible
FATAL: all hosts have already failed — aborting
Seems like quite a few folks had it as well. One way to fix it is to set validate_certs to no in the configuration/playbooks/roles/elasticsearch/tasks/main.yml file. While I can see that the PR has been merged, I do not understand why this error still occur to me even after deleting the configuration and cloning the configuration manually.
sudo rm -rf /var/tmp/configuration
cd /var/tmp
git clone -b release https://github.com/edx/configuration
cd /var/tmp/configuration
sudo pip install -r requirements.txt
cd /var/tmp/configuration/playbooks && sudo ansible-playbook -c local ./edx_sandbox.yml -i "localhost,"
In any case, I found that my copy of configuration/playbooks/roles/elasticsearch/tasks/main.yml still does not have validate_certs=no. In order to fix that, we need to edit the file in the server.
Here are some useful commands to edit a file:
- For editing
vi main.yml - For inserting
Press i //Do required editing - For exiting
Press Esc
  :wq //for exiting and saving
  :q! //for exiting without saving
So, to solve our issue:
- Run the following code
cd /var/tmp/configuration/playbooks/roles/elasticsearch/tasks
vi main.yml
- Go to line 37, right after force=no, and press i to insert.
- Type validate_certs=no in a new line.

- Press Esc and type :wq.
- Run the following command to install open edX again.
cd /var/tmp/configuration/playbooks && sudo ansible-playbook -c local ./edx_sandbox.yml -i "localhost,"
- The download elasticsearch task should not throw an error now 🙂

installing Open edX on Microsoft Azure
Few months back, my boss installed Open edX on Microsoft Azure and document his notes here. Using his notes, I managed to setup my own copy of Open edX on my Azure account and avoid most of the pitfalls (Thanks Tim!). While the whole process should be quite straightforward, it might not be if you are not familiar with Linux, Azure, SSL etc, so I decided to create a step-by-step procedure here.
What you need
- Azure account. This is where we host the Linux VM (we are using IaaS in this method) for the Open edX server. Sign up for trial here, if you don’t have one already.
- SSH client. This is used to terminal into the server. We’ll use PuTTY (putty.exe, download here).
- Private/public key pair. Since we’ll be using a password less VM, this is used to authenticate with the server. We’ll use openssl.exe to create a private key (openssh key) and a certificate (.pem). Openssl.exe is installed as part of Git (download here). Otherwise look at this article on how to get openssl on Windows. We’ll also use PuTTY Key Generator (puttygen.exe, download here) to create a PPK for PuTTY from the openssh key.
Once you have all you need, we’ll start the process by creating the public/private keypair to be used to authenticate to the server.
Create a public/private keypair
- Create a certificate with open ssl
- Open Command Prompt with Admin privilege.
- In the Command Prompt, type:
"\Program Files (x86)\Git\bin\openssl.exe" req -x509 -nodes -days 365 -newkey rsa:2048 -keyout myPrivateKey.key -out myCert.pem -config "c:\Program Files (x86)\Git\ssl\openssl.cnf"
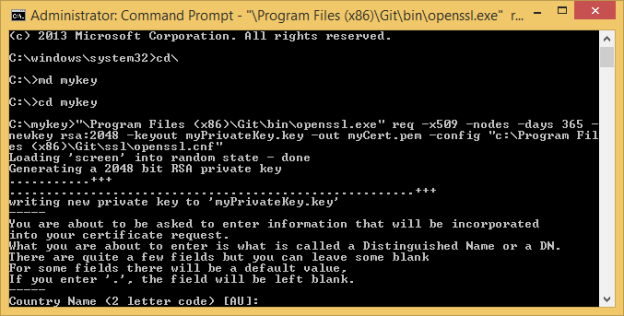
- Answer the questions that are asked.
- It would have created two files: myPrivateKey.key and myCert.pem. More documentation on this here.
- Translate the private key created earlier to an RSA private key that puttygen can understand.
- In the Command Prompt, type:
"C:\Program Files (x86)\Git\bin\openssl.exe" rsa -in myPrivateKey.key -out myPrivateRSAkey.rsakey
- The command above should produce a new private key called myPrivateRSAkey.rsakey.
- Run puttygen.exe
- Click Load.
- Find your private key, which we named myPrivateRSAkey.rsakey above. You will need to change the file filter to show All Files (*.*)
- Click Open and click OK.
- Click Save Private Key and save the file as MyPrivateKey.ppk. More documentation on this here.

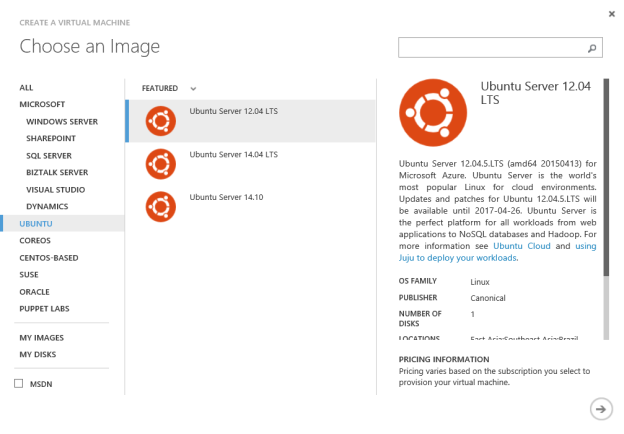
Provision a Linux VM on Azure
- Open the azure portal at https://manage.windowsazure.com and log on with your credentials
- Click New, select Compute, select Virtual Machine, and click From Gallery.
- Select Ubuntu, select Ubuntu Server 12.04 LTS, and click the next arrow.
- Name the Virtual Machine, select at least A2 for the size, and browse the certificate file we created earlier (myCert.pem).
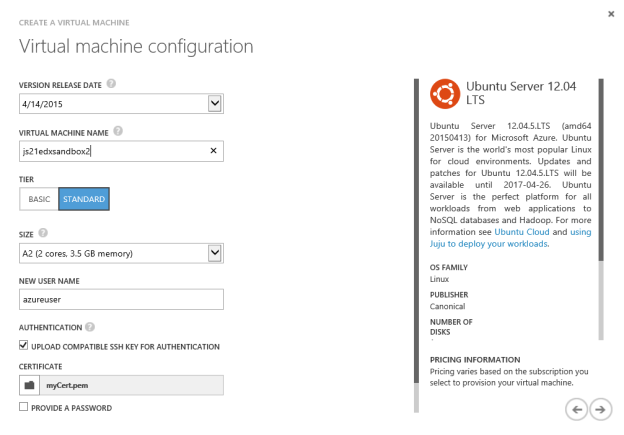
- Ensure the Provide A Password checkbox is cleared and click the next arrow.
- Name your Cloud Service DNS, select your region, open the port 80 and 18010 for edX portal and edX studio respectively, and click the next arrow.
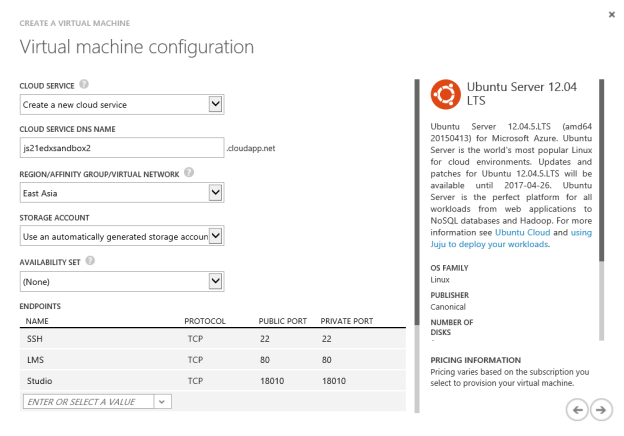
- Click the complete arrow and wait until the VM is completely provisioned and running.


Configure the server
- Run putty.exe.
- Fill in the host name using the Cloud Service DNS name.

- Click Connection, click SSH and click Auth.
- Browse to the private key (MyPrivateKey.ppk) and click Open.
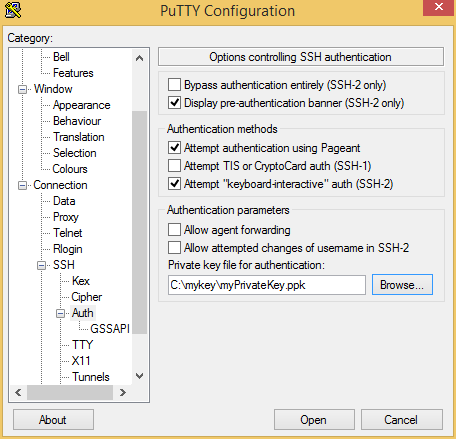 More documentation on this here.
 - In the terminal that opens, log on as the user created for the server.
- Type the following command in the terminal to update Ubuntu packages:
sudo apt-get update -y
sudo apt-get upgrade -y
- Type the following command to reboot the server:
sudo reboot


Install Open edX
- Reconnect to the server using putty.exe.
- Create a screen session by typing the following command in the terminal
- screen –d -RR
- Run the one step installation script
- The script requires that the running user can run commands as root via sudo.
wget https://raw.githubusercontent.com/edx/configuration/master/util/install/vagrant.sh -O - | bash
- If you want to install a named release, such as Birch, just set the OPENEDX_RELEASE variable before running the script. For example:
export OPENEDX_RELEASE=named-release/birch
wget https://raw.githubusercontent.com/edx/configuration/$OPENEDX_RELEASE/util/install/vagrant.sh -O - | bash
- More documentation on this here.
- Congratulations! Now you have the edX platform running on port 80 (http) and the edX studio on the port 18010.
- See edX-Managing-the-Full-Stack for how to manage and update the server once it is running.

NOTE: On my 2 counts of open edX installation, I bumped to this error.
TASK: [elasticsearch | download elasticsearch] ********************************
 failed: [localhost] => {"failed": true, "item": ""}
 msg: Failed to validate the SSL certificate for download.elasticsearch.org:443. Use validate_certs=no or make sure your managed systems have a valid CA certificate installed. Paths checked for this platform: /etc/ssl/certs, /etc/pki/ca-trust/extracted/pem, /etc/pki/tls/certs, /usr/share/ca-certificates/cacert.org, /etc/ansible
 FATAL: all hosts have already failed -- aborting
While the edX portal and studio seemed to be working, I did manage to install the third time without error with a little workaround. It is documented in the next post.
